Calibration Weight
Digital scales
Calibration Weight for Digital Scales
A calibration weight is a precision-machined stainless steel reference mass used to verify and recalibrate your digital scale. If your scale's been reading slightly off — or you've just moved it to a new surface — a single calibration weight brings it back to accurate readings in under a minute. We carry 8 sizes from 1g right up to 500g, so you can match the weight to your scale's calibration range exactly.
Which Calibration Weight Do You Need?
Your scale's manual will tell you which weight to use for calibration — it's usually tied to the scale's maximum capacity. Here's a rough guide:
| Calibration Weight | SKU | Best For |
|---|---|---|
| 1 g | HS0111 | Milligram scales and micro-balances |
| 5 g | HS0112 | Precision scales with low max capacity |
| 10 g | HS1663 | Pocket scales (10–50g capacity) |
| 20 g | HS1664 | Pocket scales (20–100g capacity) |
| 50 g | HS0113 | Pocket scales (50–200g capacity) |
| 100 g | HS0114 | Standard digital scales (100–500g capacity) |
| 200 g | HS0115 | Kitchen and mid-range scales (200–1000g capacity) |
| 500 g | HS0116 | Larger bench scales (500g+ capacity) |
Not sure? Check the bottom or back of your scale — most manufacturers print the required calibration weight right on the label. If your scale says "CAL 100g", grab the 100g weight.
| Specification | Detail |
|---|---|
| Material | Stainless steel |
| Available weights | 1g, 5g, 10g, 20g, 50g, 100g, 200g, 500g |
| Number of variants | 8 |
| Shape | Cylindrical knob style |
| Surface finish | Polished stainless steel |
| Storage | Keep in a dry, clean container — avoid handling with bare fingers |
If your scale is beyond saving, pair this calibration weight with a fresh digital scale from our scales category — the On Balance CT-250 and Myco MZ-100 are both popular picks that calibrate in seconds with the right reference weight. You can also find more background on scale accuracy in our wiki article on digital scales.
Why Your Digital Scale Needs a Calibration Weight
Every digital scale drifts from its factory accuracy over time — it's an unavoidable consequence of mechanical stress on the load cell. Temperature changes, vibrations, moving the scale between surfaces, even dust on the weighing platform can shift readings. According to a study published in Pediatric Emergency Care, more than 15% of scales tested were off by more than 6 units at higher weights, with precision decreasing as weight increased. The EMCDDA's technical guidance on analytical equipment similarly notes that regular instrument calibration is essential for maintaining measurement reliability. That's a significant margin of error if you're measuring anything where accuracy matters.
We've sold digital scales since the early 2000s, and the most common complaint we hear is "my scale is broken" — when nine times out of ten, it just needs recalibrating. A proper calibration weight and 30 seconds of your time resolves what people assume requires a replacement. The stainless steel construction on these weights means they won't corrode, chip, or lose mass over time the way cheaper zinc or brass alternatives do. Order one once and it stays accurate for years.
The honest limitation? These are functional reference weights for consumer and prosumer digital scales — they're not ASTM-certified lab standards. If you're calibrating analytical equipment in a pharmaceutical setting, you'd need certified weights with traceable certificates. For calibrating a pocket scale, kitchen scale, or bench scale at home? These do the job properly. According to research published in BMC Public Health, instrument calibration error can measurably impact results — even small deviations compound when you're making repeated measurements. Compared to brass calibration weights, which oxidise and gain mass over months, stainless steel holds its reference value far longer — it's the reason every serious scale manufacturer recommends steel.
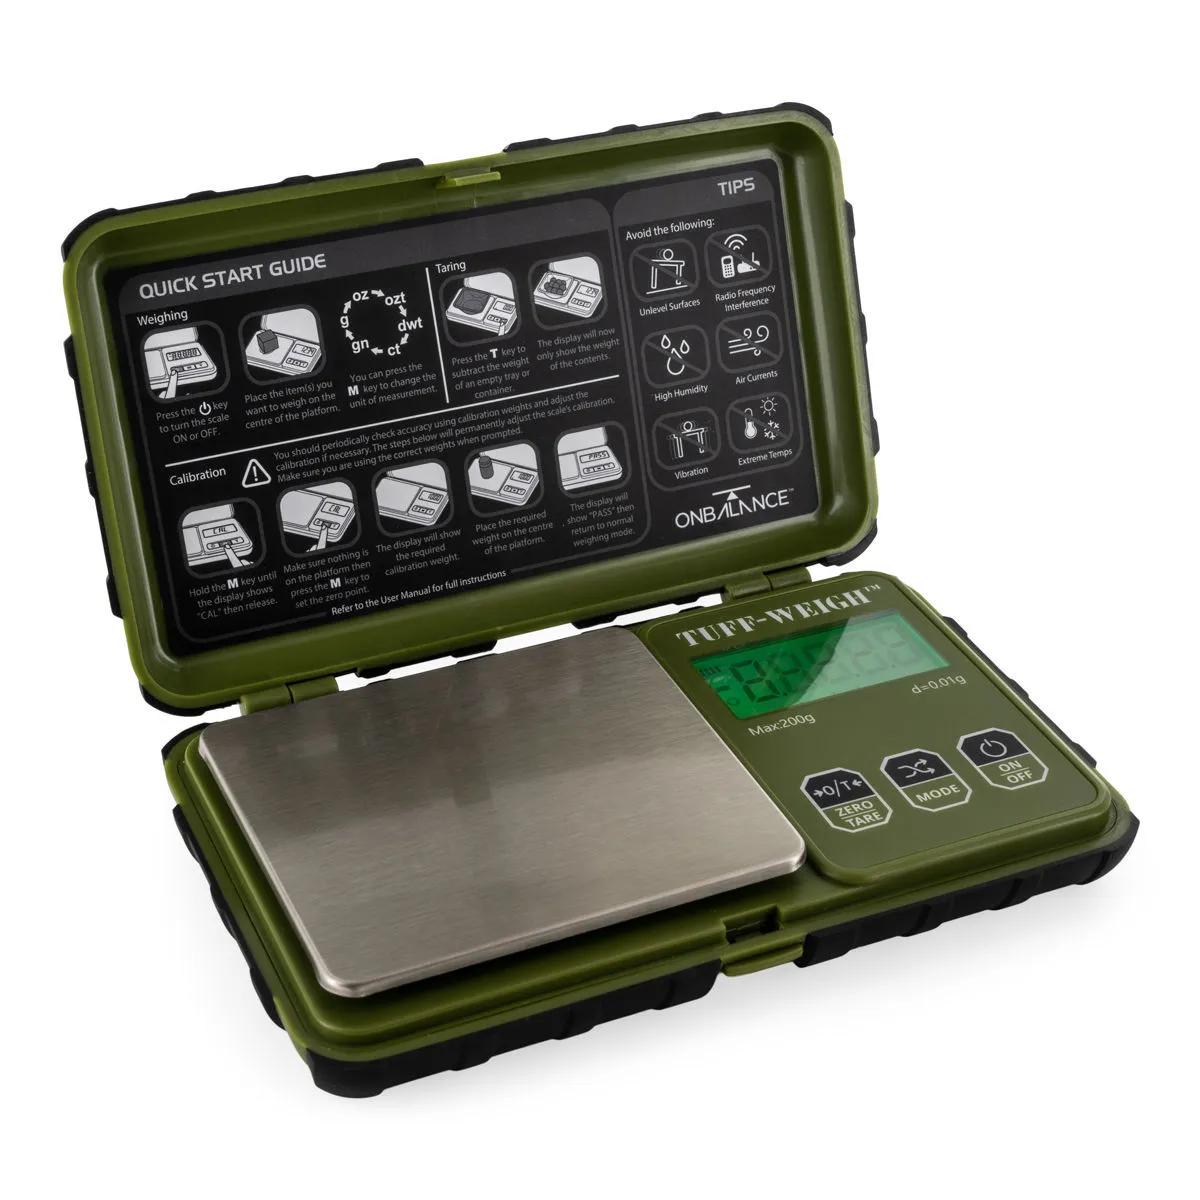
How to Calibrate Your Digital Scale
Calibrating a digital scale takes under a minute: enter calibration mode, place the correct reference weight on the platform, and wait for confirmation. Here is the full step-by-step process.
- Place your scale on a flat, stable, level surface. Carpet, uneven tables, or surfaces near vibrations (washing machines, speakers) will throw off your calibration.
- Turn the scale on and let it settle. Most scales need 10–30 seconds to stabilise after powering up. Wait until the display reads a steady 0.0.
- Enter calibration mode. This varies by brand — typically you hold the MODE or CAL button for 3–5 seconds until "CAL" flashes on the display. Check your scale's manual for the exact sequence.
- When the display prompts you, place the correct calibration weight on the centre of the platform. Don't drop it — set it down gently and steadily.
- Wait for the scale to confirm. Most scales flash "PASS" or return to the normal weighing screen. Some beep. If it displays "FAIL", clean the platform, check you're using the right weight, and try again.
- Remove the weight and verify. Place the calibration weight back on the platform in normal weighing mode. The reading should now match the weight exactly — 100.0g for a 100g weight, no more, no less.
- Store the weight properly. Put it back in its case or a small zip-lock bag. Fingerprints, moisture, and grime add micro-mass over time. Handle by the edges or use a clean cloth.