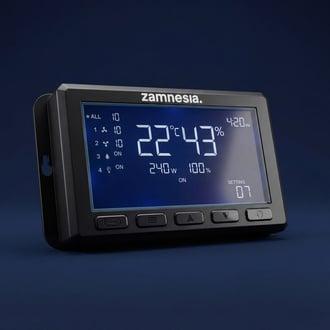
The Zamnesia Grow Environment Controller is a central grow-tent controller that reads temperature and humidity from an included probe and automatically adjusts your fans and lights. One brain, four outputs — inline fan, clip fan, 0–10 V LED dimming, and an accessory channel — running on 9–24 V DC with manual, automatic, and scheduled modes. Magnetic mount snaps straight onto a Zamnesia tent frame.
What the Zamnesia Grow Environment Controller actually does
It's the box that stops you babysitting your tent. The Zamnesia Grow Environment Controller takes live readings from the included temperature and humidity probe, then drives your kit on four separate channels so the climate inside stays where you set it. No more poking your head in at midnight to check the hygrometer.
Most growers run automatic for climate and scheduled for the light cycle at the same time.
Channels and connections on this grow tent controller
Four outputs, each with a specific job. This is what makes it a controller rather than a glorified timer.
| Channel | What it drives |
|---|---|
| Inline-fan channel | Extraction fan pulling air through your carbon filter |
| Clip-fan channel | Internal oscillating fan moving air across the canopy |
| 0–10 V LED dimming | Any LED grow light with a 0–10 V dimming port — ramp on, ramp off, dim mid-day |
| Accessory channel | One extra device — humidifier, dehumidifier, heater, whatever your tent needs |
| Probe input | Combined temperature + humidity probe (included) |
| Power input | 9–24 V DC (adapter not included — match it to your existing kit) |
| Mount | Magnetic — snaps onto the steel frame of a Zamnesia tent |
Why a grow environment controller is worth the shelf space
Without one, you've got a wall timer for the light, a separate thermostat-plug for the fan, a hygrometer you check by eye, and three different schedules that don't talk to each other. When the room temperature climbs in July, your fixed-speed extraction fan can't react and your tent hits 32°C while you're at work. We've seen plenty of grows tank in week 6 because of exactly this.
The Grow Environment Controller replaces that mess with one device reading one probe. If RH creeps over your target during lights-off, the inline fan ramps up. If the canopy gets hot under full LED, the controller dims the light or pulls more air. The 0–10 V dimming is the bit most growers underestimate — soft-starting the light over 15 minutes instead of slamming it on at full power is gentler on young plants and on your electricity bill.
It also keeps the cable spaghetti down. One unit on the tent frame, one probe inside the canopy, four outputs to your gear. That's it.
How this compares to the rest of the Zamnesia grow range
If you've already got a Zamnesia Grow Tent (60x60, 80x80, or 100x100), this controller is designed to bolt onto the frame magnetically — no drilling, no zip ties. The Grow Tent Kits ship with a fan and filter; this controller is what turns that kit into an automated setup. Honestly, for a first grow in a 60x60 you can get away without one. From 80x80 upward, where you've usually got bigger lights and more thermal load, the difference in consistency is obvious.
Pairs naturally with the Zamnesia Grow Tent Kit 80x80x200 or 100x100x200 — the kit gives you the inline fan, carbon filter, and LED; the controller gives them a brain. If you're running a 0–10 V dimmable LED from another brand, check the port type before ordering — the controller uses the standard 0–10 V protocol.
How to set up the Zamnesia Grow Environment Controller
- Snap the controller onto a steel frame bar inside or outside your Zamnesia tent — the magnet does the work.
- Hang the temperature/humidity probe at canopy height, roughly in the middle of the tent. Not under the light, not against the wall.
- Plug your 9–24 V DC adapter into the power input. Match the voltage to whatever your existing fan/LED kit uses.
- Connect the inline fan to the inline-fan channel and the clip fan to the clip-fan channel.
- Run a 0–10 V cable from the controller to the dimming port on your LED.
- Plug your accessory device — humidifier, heater, whatever — into the accessory channel.
- Pick a mode: manual to test each output, automatic to chase a target temp/RH, scheduled to set the photoperiod and fan curve by the clock. Most growers end up combining the last two.
- Run it empty for 24 hours before introducing plants. You want to know the tent climate settles where you told it to.
What's in the box
- Grow Environment Controller unit
- Temperature + humidity probe
- Screw set + wall anchors (for non-magnetic mounting if needed)
Not included: the 9–24 V DC power adapter. Use the one that came with your fan or LED, or grab a generic adapter matched to your kit's voltage.
Honest limitations
A few things to know before you order. The controller drives gear within its channel spec — it's not a universal hub for any device on the planet. The 0–10 V LED channel only works with lights that have a 0–10 V dimming port; older non-dimmable LEDs can still be switched on the accessory channel but you lose the gradual ramping. No adapter in the box means you'll need to source one if you don't already have spare 9–24 V DC kit. And the magnetic mount is designed for Zamnesia tent frames — it'll stick to most steel frames, but on aluminium frames you'll want the screw set.
Frequently Asked Questions
Does the Zamnesia Grow Environment Controller come with a power adapter?
No — the controller runs on 9–24 V DC but no adapter is included. Use the adapter from your existing fan or LED kit if the voltage matches, or buy a generic 9–24 V DC adapter separately. This keeps the price down and avoids you ending up with three identical adapters in a drawer.
Will it work with non-Zamnesia LEDs and fans?
Yes, as long as the LED has a standard 0–10 V dimming port and the fans run on 9–24 V DC. The 0–10 V protocol is industry-standard, so most modern dimmable grow LEDs are compatible. Check your light's spec sheet for "0–10 V dim" before ordering.
Can I use it without a Zamnesia tent?
Yes. The magnetic mount sticks to any steel frame, and the included screw set + anchors let you mount it on wood or wall. The probe, channels, and modes work identically regardless of tent brand. The magnetic mount is just optimised for the Zamnesia tent frame.
What's the difference between automatic and scheduled mode?
Automatic reacts to the probe — if temp or RH drifts off target, the controller adjusts fans and lights to bring it back. Scheduled runs on a clock — lights on at 06:00, off at 00:00, fan ramps at set times. Most growers run scheduled for the light cycle and automatic for climate at the same time.
Where should I hang the temperature and humidity probe?
At canopy height, in the middle of the tent, not directly under the light and not against a wall. You want the reading the plants actually experience, not the hot spot under the LED or the cool spot at the floor. Move it up as your plants grow so it stays at the top of the canopy.
Do I still need a separate timer if I have this controller?
No — scheduled mode replaces the wall timer for both your light and your fans. One device handles photoperiod, fan curves, and climate response from a single probe. That's the whole point of a grow environment controller.
Last updated: April 2026


